This program and help-file will be updated regular. All news can be downloaded at:
http://www.kgg-soft.de
Contents:
First some pictures
General Introduction
Crash Course With an Example (online!)
Detailed List of all the Functions of the "Harmony"-Window
- ... First block
- ... Second block
- ... Third block
- ... Fourth block
- ... Key assignment
Detailed List of all the Functions of the "Lead-Sheet"-Window
- ... Functions of the Mouse
- ... Functions of the Keyboard
- ... How to Create Text
- ... Special Functions in the Note Mode
- ... Functions of the Menu
The next four pictures will give a quick overview of the functions of 'B_Seven':
Before we start it is necessary to explain some of the expressions:
| Harmonies | are chord or chord sequences. They are written as chord symbols in the bars or above the text. Special type fonts are used for this, which are adjusted to the individual style of the chord symbols. |
| Lead-sheets | are pieces of papers on which the harmonies and bars of a piece of music are written. Musicians need them, especially if they are not yet familiar with the piece of music. |
| Texts | are written words for transparancies or beamers. Chords are very often written above the words or syllables. However, only a person who knows the song already can play the piece correctly as far as the timing of the chords is concerned. |
| Cursor | The colour of the cursor is red. Usually harmonies are entered at the position of the cursor. |
| Mouse pointer | is the pointer of the mouse. Starting from the position of the mouse e.g. text can be entered. |
| Button | is an element which is displayed in the shape of a button. When clicking the mouse this button reacts and performs the required function. |
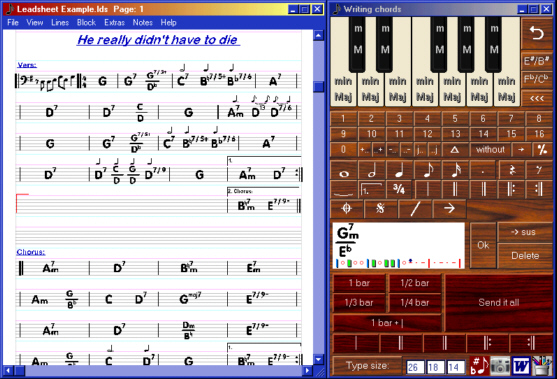
When starting the program, two different windows, located beside each other, are displayed first:
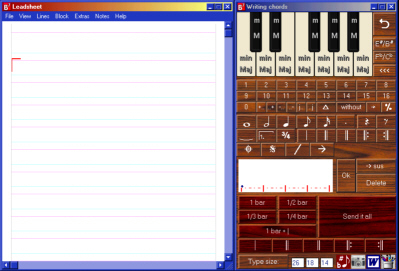 Chords and chord sequences can be created in the right window. They are to be transferred into the left window. Here chords, harmonies and special characters are handled like object, which can be moved, doubled or deleted as desired. Additionally, music texts, notes and internal instructions can be created in the activated left window.
The right window is called "harmony" and the left window is called "lead-sheet".
As long as the window "lead-sheet" is opened, all the harmonies created in the "harmony"-window can be inserted according to the cursor`s position. The colour of the cursor is red.
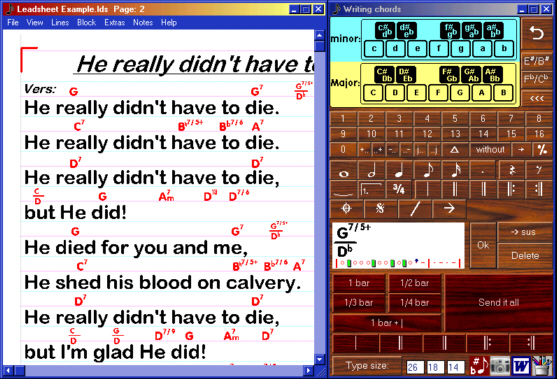
If the "lead-sheet"-window is closed, the created harmonies are copied into the WINDOWS-file. Programs like WORD or corresponding programs can then insert the chords into the respective document. By the way, in order to be able to do so there are two pre-formatted WORD documents called: Leadsh1.doc and Leadsh2.doc.
I would recommend to use the "lead-sheet"-window, because there are more practical possibilities to handle harmonies, notes and text.
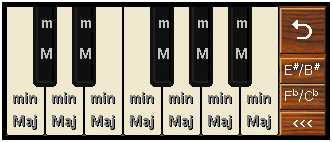
The keyboard is displayed in two different ways. The big button in the upper right corner can be used to switch from one keyboard display to the other. Every key or button displays one chord (from C to B).
"M" on the keys means major, "m" means minor. There is an exception with minor: If the button "Sus" has been pressed, which is located in the lower part of the window, "sus" will be displayed instead of minor.
General facts:
If a chord and its add-ons have been clicked on once, it will be displayed normally. If two different chords and their add-ons have been clicked on, one after the other, the first one clicked will be put on top of the other.
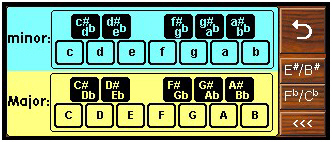
The black keys work differently:
If a black key is clicked once, it will be displayed as a flat chord. If the same black key is clicked twice, the chord will be displayed as a sharpened chord (e.g. Db => C#).
With the buttons "E#/H#" and "Fb/Cb" the key B can be displayed as Cb or F as E# (is normally not used).
Every step of creating chords can be undone with the button "<<<".
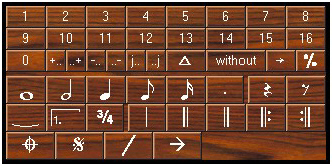 With these buttons, add-ons will be created for the respective harmonies in the upper block. They will be added onto the chord and will be automatically separated with a slash. Since it does not matter if the add-ons "j" (for major), "+" (for sharpen) and "-" (for flat) are before or after the cipher, there are two different ways to use them: The button "j.." is used to put "j" first (e.g. Cj7 for C major7). The button "..j" is used to put it after (e.g. C7j for C major7). The buttons "+" and "-" work accordingly.
The button "without" means that the next digit will be crossed out (e.g. if a chord should be played without the fifth -> "without" 5)
In the lower block special characters can be written which are needed for the lead-sheets. The following characters are some of them: Different notes to show the rhythm, bar lines and character marks.
The repetition brackets are worth mentioning, which can be defined in more detail after pressing the button. The button "3/4" is also important to define the time signature.
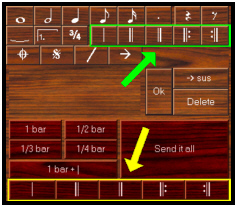 ATTENTION: These bar lines (in the green box) are only characters in contrast to the bar lines displayed in the third block (yellow box). If necessary, they are copied to the position of the cursor. The bar lines in the yellow box will call a new bar in the sequence of chords.
Third Block:
 This block is used for moving harmonies and harmony sequences.
The harmony and/or the special character can be seen in the integrated window. With harmony sequences the position of the relevant chord in the bar can be seen in the lower border.
The "sus" button has already been mentioned above. It displays a minor chord as a "sus"-chord. By clicking this button once more the minor chord will be displayed as normal again.
The button "delete" deletes the presently displayed chord symbol. The present chord sequence will be deleted by clicking the button once more.
Individual chord symbols, as well as chord sequences with a maximum of 4 bars can be copied. The present chord symbol can be copied to the respective cursor position by pressing "OK". The chord sequence including the bar lines can be copied into the line where the cursor is by pressing the button "Send it all".
Creating and copying a typical chord sequence:
- Click on one of the bar lines displayed below.
- Create the chord G7
- Click on the button "1 bar + |"
- Create the chord C7
- Click on the button "1/2 bar"
- Create the chord C#0 (Click twice on Db-major and then click '0')
- Click on the button "1/2 bar"
- Click on the lower button "|"
- Create the chord C, then the chord D (result: C is put on top of D)
- Click on the button "1/2 bar"
- Create the chord D above E
- Click on the button "1/4 bar"
- Create the chord E10- above Bb
- Click on the button "1/4 bar"
- Click on the lower button "|"
- Create the chord A7/9 (first A, then 7, then 9)
- Click on the button "1 bar"
- Click on one of the bar lines displayed below.
- Click on the button "Send it all"
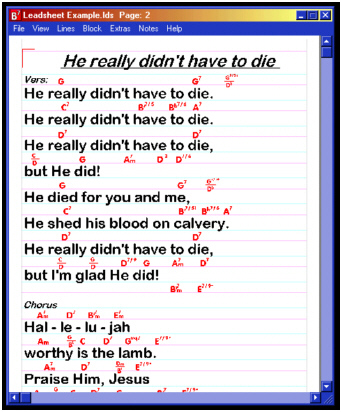
Now, the whole chord sequence will be displayed properly in the left "lead-sheet"- window.
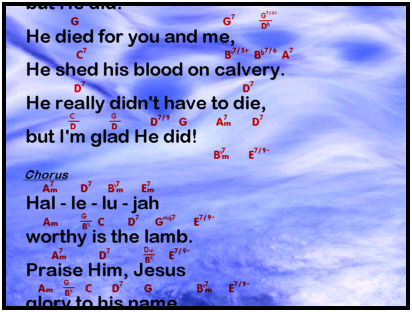
The result will be as follows:

You can listen to the chords if you put the mouse over the chord and press the 'Shift'-key:

 Here you can find all the other functions of the "harmony"-window.
The option type size is only significant if the harmonies should be copied into an external word processing. Type sizes are set for internal use.
The button "type size" only explains to which degree type sizes can be changed for external word processing. The three different figures stand for the following type sizes:
| 1st figure: | Type size for superior letters (must be large font!). |
| 2nd figure: | Type size for a normal chord. |
| 3rd figure: | Type size for text between the lines. |
The four icons have the following functions:
| 1st icon from the left: | Transposing the marked section in the "lead-sheet"- window or in a text processor. |
| 2nd icon from the left: | With this option, parts of the screen (e.g. notes from the notations program or scanned written notes) can be transferred into the "lead-sheet"-window. |
| 3rd icon from the left: | Starting an external word processing. This will be checked when first starting the program. |
| 4th icon from the left: | Starting a drawing program to insert special graphical characters into the "lead-sheet"-window. |
| F1 | Whole bar |
| F2 | Half bar |
| F3 | A third of a bar |
| F4 | A forth of a bar |
| F5 | Normal bar line |
| F6 | Double line (left) |
| F7 | Double line (right) |
| F8 | Double line with repeat mark (left) |
| F9 | Double line with repeat mark (right) |
| F10 | without function |
| F11 | Whole bar + bar line |
| F12 | "Send it all" |
| Return | "OK" copy harmony |
| Delete | Delete harmony |
| Space | One step forward while writing a sequence of chords. A harmony wich is written will be inserted into the chord-line. If the pointer position is on a bar, a new bar will be inserted into the chord-line. |
| Dot (.) | Same function like 'Space', but without inserting harmonies. |
| Backspace | One step backwards in the chord-line. |
| @ | Brief help |
 In the "lead-sheet"-window harmonies, text and notes can be created and positioned.
There are three different modes in the "lead-sheet"-window:
1. Normal harmony mode (with or without lines of a stave)
2. Text mode to write words in a large type and to write harmonies in smaller letters above the text row.
3. Note mode to create notes that will usually be integrated into the harmonie mode with lines of a stave.
Harmonies, note sequences and word lines are displayed as an object and can be moved as desired.
| Left mouse button | Hold and drag | 1. Move object |
| 2. Drag block | ||
| Right mouse button | Hold and drag | 1. Clone object |
| 2. Drawing beams and/or slurs (only in note mode) | ||
| Press shift key | Put mouse on the chord | Listen to chord |
| Press shift key with pressed Ctrl key | Put mouse on a chord | Listen to staggered chord (single notes of chord) |
| In the note mode only: | ||
| Click with left mouse button | ==> | Stem of note up |
| Click with right mouse button | ==> | Stem of note down |
| Press shift key | Put mouse on a note | Listen to note in treble clef |
| Press Ctrl key | Put mouse on a note | Listen to note in bass clef |
| All the general keys | writing text according to mouse position. The text will be displayed big or small, depending on the raster position! |
| Special keys: | |
| Return | End of text entry |
| Ctrl+Return | End of text entry with an alternative text representation |
| @ | Brief help |
| Cursor keys | Moving the respective part of the window |
| Ctrl+cursor keys | Moving the cursor within the window |
| Page up and page down keys | New page and/or previous page |
| F1 | Raster on/off |
| Plus (+) | Listen to the next harmony |
| Minus (-) | Listen to the last harmony |
| # | Listen to the aktual harmony |
1. Select 'Extra' from the menu and press "text mode"
2. Select 'Extra' from the menu and press ">>edit text"
3. Write the text and close the window - now the text will be moved to the "lead-sheet"-window.
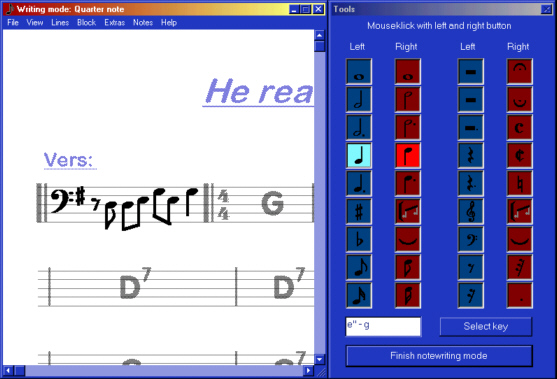
Special Functions in the Note Mode:
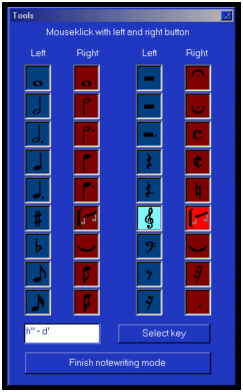 When opening the note mode, a window appears on the right from which you can select, which action should be processed when clicking the mouse button. There are two different blocks
with 9 functions each for the right and the left mouse button.
These functions can be alternatively called up via the menu or the function keys (F1 - F9).
It can be switched from one block to the other by pressing the function key F11. The key F12 terminates the note mode.
The button "select key" should be used to automatically place the flat and the sharp signs. Furthermore, you can hear the notes in accordance with the key chosen.
The following functions are worth mentioning:
1. Creating a beam.
2. Creating a slur.
In both cases, a rectangle must be dragged with the right mouse button. Click the left mouse button to finish the action. The shape of the beam or the slur depends on how the rectangles is dragged:
| Action: | Beam: | Slur: |
| >From the upper left to the lower right | sloping decreasing | sloping decreasing with belly pointing down |
| >From the lower left to the upper right sloping increasing | sloping increasing with belly pointing up | |
| >From the upper right to the lower left | no action | sloping increasing with belly pointing down |
| >From the lower right to the upper left | no action | sloping decreasing with belly pointing up |
| >From the upper left to the lower right with a small width | Beginning of staff | --- |
| >From the upper right to the lower left with a small width | End of staff | --- |
Beamer mode:
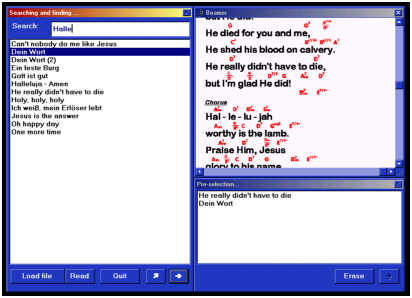 You will find three windows in the beamer-mode.
1st window: Select the song by surching words or expressions of the song.
Send the selection to the beamer or to the pre-selection window.
You also can select the song with a fileselectbox.
2nd window: Mirror the picture of the beamer into this window.
Move the text with the vertikal scrollbar. Move the page or move to the next marked text. To mark a text let the first letter be '§'.
3rd window: Pre-selection of songs.
ATTENTION: If you have a grafik-mode to increase your screen to the second screen,
move the beamer-window into the second screen. This is the way to put the picture for the beamer into a seperated screen.
 Keyboard functions:
| Cursor keys: | Move the picture |
| page up/down | Change page |
| Tabulator | Change from smooth scrolling to quick jump. |
| Plus (+) | Next marked text |
| Minus (-) | Last marked text |
| Dot (.) | Set position |
| Space | Switch the mouse on or off. Rebuild the picture. |
Just try it out ...